
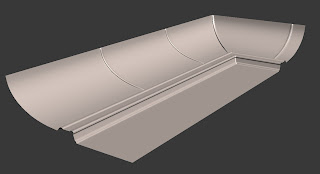
To create my roof, i first modelled 2 low poly sections based on the dimensions of my original blockout in max. The sections were a corner piece, and a straight piece. Each piece was to be divided by a 'rib', to try and hide any seams, as I knew seams would be a problem with the roof being a a quite glossy white material. Then i made the highpoly to soften the edges and create the 'ribs', then i baked the normals. These images show 3 straight sections and a corner section at the end. I first intended to have these sections individual, but the seams were just too obvious in UDK, even with an accurate and high res lightmap.

To try and eliminate the seams, i thought that creating the whole roof in max, by welding all the necessary sections together and then applying smoothing groups would solve the problems.In max everything looked good, even in udk before lighting was built, the default vertex lighting didnt show any problems, but as soon as lighting was built, I was getting these unexplainable specular seams between sections. I did all the usual checks like welding verts, reseting xform etc. Even put my normal map to flat 128 purple to see if that was a problem, but not so.

It turns out, after so much forum searching, and a ridiculous amount of re-UVing and reimporting, that it is a fairly unknown issue/quirk with UDK.
(I'm going to refer to UV channels as first and second, rather that 0 and 1 or 1 and 2 as they differ between max and udk)
In max, i had my diffuse/normal uvs in the first mapping channel, as usual with any mesh. Then i made my lightmap in the second channel. Apparently, UDK calculates specular lighting on whatever is in the first channel (usualy the texture). But because my roof mesh was made of several of the same sections, with each section using the same area of normal map, these uvs weren't attatched, shown in the first image. For each section, the UVs were offset by 1 or overlapped. Because UDK was calculating the specular lighting based on this set of UVs, it was taking into account the splits in the UV islands. My lightmap however, doesn't have these splits, except on corners. By switching the UV channels in max, so that the unbroken lightmap was in the first channel instead, my specular problem was solved. I just had to tell the normal map texture in the material editor to look up the second UV channel rather than the default first, by adding a texture coordinate node and setting it to the second channel.


I then added some pattern onto the inside with nDo, and then made my lights, which were quite high tri count for their size, but it was the only way i could get the pearly translucency in the material editor. They looked rather ghost-like otherwise

No comments:
Post a Comment