Wash basin cabinet

 I knew the wash basin was going to take some time to get right and unfortunately i was right, taking about 4 or 5 days to get right, including the tweaking and getting lighting right. It consisted of 3 components, the basin itself, the doors, and the wash facilities inside. I began with the low poly model of the cabinet and its innards and then baked a hi poly to it.


 I added smaller details with ndo in photoshop, and used the normals and AO to start on the diffuse. The doors were pretty straightforward, but i had to tweak the brightness of the wood to get it consistent with the other wood in the level in udk, as it is being lit dynamically because it opens and closes.


 The wash facilities inside are made of simple alphas, except the tap which is modelled. All the normals are done with ndo, except the chamfer on the box thing bottom left which i had to bake. In UDK, i had a bit of trouble with the lighting. The ligtmap seemed to undo the work of the normal map on the glossy white parts, and looked pretty horrific, but a combination of lightmap tweaking and washing out any errors/seams with a moveable pointlight seemed to do the trick. I generated a simple cubemap to make the metal all nice and chromey, but that will need to be redone later on. It's not perfect as it is, but I know i would spend way too much time tweaking it


Scans

 These are a few ancient, random scans i forgot about. I was using graph paper to plan out the size of panels and meshes, as i could use the lines to represent the grid in udk or max. I used it to plan out texture space and lightmaps in some cases aswell, so i would ensure getting the same texture and lightmap densities throughout the level. With the train being only 10ft wide at its widest point, i felt detail and consistency was very important


Slidey door

 For my sliding door that enters the dining carriage, i knew i wanted a window so you could see the light pouring through as it slides open. I also wanted to break up the squareness of all the wood panels so i made a few designs, and then created alphas from them to test how they'd look in the level.


 I decided that anything too flamboyant looked out of place, so kept it fairly simple, with just a bit of wooden design that would break up the glass. I created the design in photoshop, bumped using nDo and made alphas from the image. Then in max i layered the alphas to give a bit of extra depth.
 The door frame required more modelling than i first thought as there would have been holes in the geometry when the door slides open
 As the door is a mover, i had to fiddle with the lighting settings to make it fit with the rest of the wood. After lightmapping, i told it to use precomputed shadows, so the shadows get baked as normal when the lighting is built. It did however leave completely black shadows on the floor and door frame where it sits, only noticeable when the door is opened, so i told it to not cast static shadows and this seemed to eliminate the problem


Wood. Lots of it

 A well overdue insight into the processes i used to create the wood panelling that makes up the majority of my train.
The first thing i did was to create a generic texture, that i would use over and over again. I started off with a small image of our front door, and started tiling it, then using the patch tool, eliminated seams and repetition, and then repeated the process until i had an image nearly 4000x4000. Then using one of my references photos, copied the layers and made variations in brightness and hue. With this document, i would be able to pick different grains for different wooden assets, but still keep the same uniform values throughout the level.
To keep consistency further, the first material i made in UDK became a parent material, so any other wooden materials i made would be material instance constants, so every piece of wood in the level would keep the same specualr level and glossiness, saving time and keeping materials constant.


Most of the panels followed the same or a similar process. Simple low poly model, baked onto with a high poly. I didnt create a shadow map in max, as my panels aren't really going to look like they're lit from one major light source above, so i used nDo and a bit of homemade ambient occlusion using layer blending options in photoshop.

 Then i slapped my wood texture on beneath the multiplied AO in photoshop, and rotated where appropriate to get the grains going the right way.
 All very simple, but there were alot of different meshes to make, these are actually just a few that happened to be in the same max scene.
 Doors required a bit more attention

Of course, everything need to be lightmapped. I created several checker pattern bitmap images, a 32x32, 64x64, and 128x128. I made the colours this light blue and violet as it was easier to see selected and deselected faces when lightmapping. I've lightmapped everything with these checkerpatterns as it results in clean lightmap results in UDK, lightmap consistency, and just makes the whole thing easier and quicker. Most of the time i dont need to go back and change the lightmap as i normally nail it first time with this method. I also recommend having a lightmapping album/playlist that you only listen to when lightmapping, so you can actually look forward to doing it  : )


Roof Process


 To create my roof, i first modelled 2 low poly sections based on the dimensions of my original blockout in max. The sections were a corner piece, and a straight piece. Each piece was to be divided by a 'rib', to try and hide any seams, as I knew seams would be a problem with the roof being a a quite glossy white material. Then i made the highpoly to soften the edges and create the 'ribs', then i baked the normals. These images show 3 straight sections and a corner section at the end. I first intended to have these sections individual, but the seams were just too obvious in UDK, even with an accurate and high res lightmap.
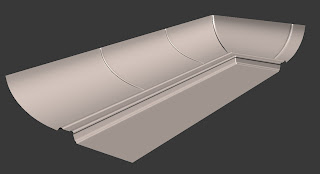

To try and eliminate the seams, i thought that creating the whole roof in max, by welding all the necessary sections together and then applying smoothing groups would solve the problems.In max everything looked good, even in udk before lighting was built, the default vertex lighting didnt show any problems, but as soon as lighting was built, I was getting these unexplainable specular seams between sections. I did all the usual checks like welding verts, reseting xform etc. Even put my normal map to flat 128 purple to see if that was a problem, but not so.
  
It turns out, after so much forum searching, and a ridiculous amount of re-UVing and reimporting, that it is a fairly unknown issue/quirk with UDK.

(I'm going to refer to UV channels as first and second, rather that 0 and 1 or 1 and 2 as they differ between max and udk)

In max, i had my diffuse/normal uvs in the first mapping channel, as usual with any mesh. Then i made my lightmap in the second channel. Apparently, UDK calculates specular lighting on whatever is in the first channel (usualy the texture). But because my roof mesh was made of several of the same sections, with each section using the same area of normal map, these uvs weren't attatched, shown in the first image. For each section, the UVs were offset by 1 or overlapped. Because UDK was calculating the specular lighting based on this set of UVs, it was taking into account the splits in the UV islands. My lightmap however, doesn't have these splits, except on corners. By switching the UV channels in max, so that the unbroken lightmap was in the first channel instead, my specular problem was solved. I just had to tell the normal map texture in the material editor to look up the second UV channel rather than the default first, by adding a texture coordinate node and setting it to the second channel.


 I then added some pattern onto the inside with nDo, and then made my lights, which were quite high tri count for their size, but it was the only way i could get the pearly translucency in the material editor. They looked rather ghost-like otherwise