Orchid

 
Quickly high polly'd a simple art decoish style vase, and then created an alpha diffuse with one petal, a few buds and some stem. I arranged the petals to make one orchid flower, and then copied them around the plant till i got the right shape
To get a bit more variation, i used vertex painting in the material editor in UDK. This made all the petals a light blueish/white, and i could paint splashes of pink onto petals where i wanted. I made the petal material unlit, as it gave better results, and as a bonus i didn't have to lightmap each individual petal. But the vase is lightmapped. Fun little asset to create, wish i'd given myself more time to do more stuff like this
+ small cubemap on the vase

Bed


I made some elements of my bed, like the matress and pillow a long long time ago, shown in a previous post. Because the blanket was dropped using cloth modifier onto a bed without any walls to limit its fall, that part had to be redone.The retopologising was a bit painful, as I wanted to keep some of the shape of the folds with geometry, but sell the rest with normals and AO. From some angles it really works, but others it doesn't.


I struggled getting a nice fine linen look for the white fabrics. Playing with spec, even slightly, gave it a kind of latexey look, and making it brighter kind of lost a lot of shadow detail. Was never entirely happy with it but all of its elements to create it took a while so i had to move on

Table Lamp

My table lamp was an asset I was looking forward to making. The stande and the shade were to be multi subbed, so i made a high poly for the stand first. The fun part was the shade, where i used cloth modifier, like i did on my curtains, and scrunched the high poly plane so that the folds were more dense toward the top where the shade tapers. I then created a seperate high poly piece, not shown which was to act as the framework underneath.behind the fabric. I baked both high poly pieces in max to one side of the low poly[which would just repeat on every face] and then overlayed the two normal map bakes in photoshop, softly erasing where required. I also baked AO maps. For the off state of the lamp, this would just add to the impact of the folds. For the shade when the light was turned on, the dark lines would help sell the effect better, rather than having a whole shade glowing unrealistically.


In the material editor, I multiplied the diffuse by a peachy colour, to make it less pink and more the colour of the light emitting from the bulb. I powered the result to make those dark areas more obvious, and then multiplied that result to control the glow, plugging into the emissive. The Alpha mask was storeed in the blue channel of the normal to save texture space, and a cubemap was generated for the stand.


Sofa

 The sofa for my cabins was based on the designs in a lot of my reference images. I made the high poly and baked both normals and ambient occlusion.  I messed about with a few colour and pattern variations, and also painted in some normals to divide the seat and back rest cushions. Should have been high polly'd but it was an after thought and the ao bake took its time the first time round


The head rest cushions were multi-sub objected, and using my pattern i made a lace cover appear to wrap around it, using ndo and a bit of shadow on the diffuse. I also added a leather strap and small alpha brass rings that hang from the cabin wall.


I quickly made some pull down blinds for windows that wouldn't have curtains.  I slightly scrunched up some cloth in max and made a bit at the bottom that would be the rubber part. i baked the fabric onto a flat plane and the rubber part to a flat plane alpha[because of the shape, although the mask was embedded in the normal maps blue channel]. I then applied my small tiling pattern in udk to the fabric and messed with settings to get it to appear lit slightly from the outside, but without it being translucent, avoiding the ghostly appearance which i didnt want. The rubber was a flat grey with a bit of gloss highlighting the normals
 Also made some quick shelves and the bedside table


Tablecloth and curtains


For my tablecloth i dropped a plane onto the shape of my table. I used garment maker which i now regret, because of the triangles. I had to select so many edges and delete them to get the right topology, but i learned from my mistake. It's so much easier to have a lattice of edgeloops you can select and delete, so i've done that since.
After retopologising one corner, i just flipped it for the sake of my sanity. I extruded the lower edges, mulit sub objected them and aded a really small, tiling frilly little lace alpha. I set the texture to onebitalpha compression, so the memory footprint is only 3.39kb, for a 64x64 texture.

For my curtains I followed a tutorial. I had a plane with lots of edgeloops, then used boxes as control points to scrunch the mesh when cloth modifier was simulating. I originally planned to use render to texture to get the diffuse to bake onto my low poly, hence why i put the pattern onto my high mesh. But, because of the curvy edges defining the shape at the bottom of the curtain, i decided to use tris more than textures to sell this asset.

The material just uses a tiling 128 diff for the pattern, with spec controlled in the mat editor. I also unwrapped a loop of faces at the top, arranged them into a seperate uv channel, and applied a 32x32 normal to make it look like its scrunched where it connects to the pole on the other side.


Dining Chair


 I modelled my dining chairs a looong time ago based on these orthos i did. I wanted individual armchairs as opposed to the 2 to a seat kind of chairs as armchairs suggest a bit more elegance and first class. I made the high poly more recently (mesh in the middle) and the bake came out good, aswell as the ao. The third mesh below is just my normals, with normal pattern overlayed.

 For the pattern, i found a few patterns i liked, and did a bit of editing, tracing over parts i liked etc. Then i duped and flipped until i got this pattern that i would reuse on other assets. It's at a nice 4000x4000 pixels, cause vectors do my head in.
  

I was completely unsure of what colours i'd be using, but as a major influence was the 'Blue Train', I felt it needed some blue. I did several hue changes with different layers on my diffuse , and tested how they looked. Anything light didn't really look good, and a bold blue was a nice contrast with the redish wood, and the white table cloths


 Painting over the asset
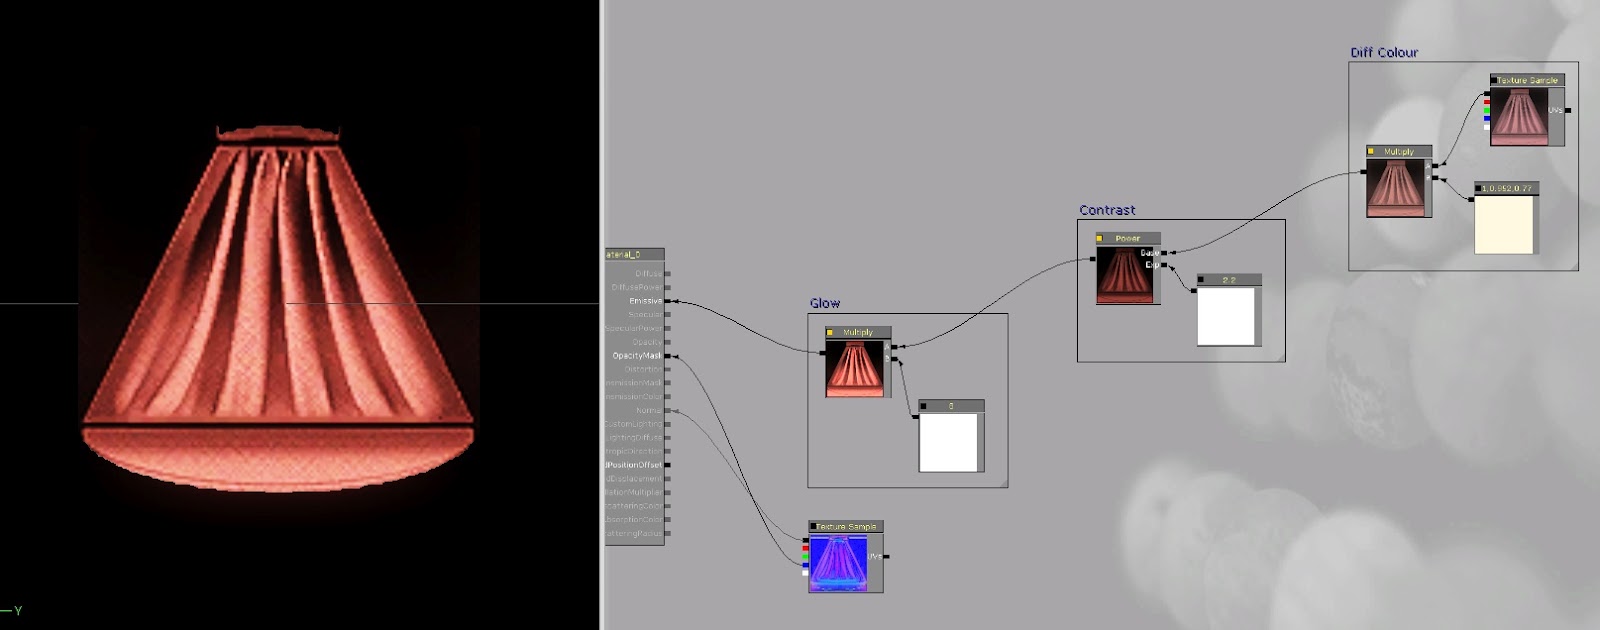
Final asset in udk mesh viewer, with finished materials. I powered the spec so that the lighter, more elevated part of the fabric would give a goldish, orangey shimmer when hit with the setting sunlight through the windows
I decided to batch my  chairs into 6. There are a few pros and cons why i did this. Basically, there are 36 armchairs in the dining carriage. At 1500ish tris each, thats fine, because theyre instanced. But each mesh calls on 2 pretty large textures in its material, multiplied by 36 thats quite alot of work for the gpu. By grouping into 6, i've reduced 72 texture calls down to 12. Because of the way the train is laid out, and the design of the chairs, individually they don't really occlude eachother(theres pretty much always a bit of mesh sticking out somewhere), and that's usually the main reason not to batch things. The only drawback is having a 9000ish tri mesh instead of 1500, but if i'm right, it's hopefully some good optimisation


Wash basin cabinet

 I knew the wash basin was going to take some time to get right and unfortunately i was right, taking about 4 or 5 days to get right, including the tweaking and getting lighting right. It consisted of 3 components, the basin itself, the doors, and the wash facilities inside. I began with the low poly model of the cabinet and its innards and then baked a hi poly to it.


 I added smaller details with ndo in photoshop, and used the normals and AO to start on the diffuse. The doors were pretty straightforward, but i had to tweak the brightness of the wood to get it consistent with the other wood in the level in udk, as it is being lit dynamically because it opens and closes.


 The wash facilities inside are made of simple alphas, except the tap which is modelled. All the normals are done with ndo, except the chamfer on the box thing bottom left which i had to bake. In UDK, i had a bit of trouble with the lighting. The ligtmap seemed to undo the work of the normal map on the glossy white parts, and looked pretty horrific, but a combination of lightmap tweaking and washing out any errors/seams with a moveable pointlight seemed to do the trick. I generated a simple cubemap to make the metal all nice and chromey, but that will need to be redone later on. It's not perfect as it is, but I know i would spend way too much time tweaking it


Scans

 These are a few ancient, random scans i forgot about. I was using graph paper to plan out the size of panels and meshes, as i could use the lines to represent the grid in udk or max. I used it to plan out texture space and lightmaps in some cases aswell, so i would ensure getting the same texture and lightmap densities throughout the level. With the train being only 10ft wide at its widest point, i felt detail and consistency was very important